When Apple announced "full Exchange integration" in Snow Leopard, everyone thought they could finally swoosh the Entourage icon from their dock. But when it was known only Exchange 2007+ was supported, the rest of the corporate world sighed and continued limping along on their older-than-Exchange 2007 servers.
But using a little app called DavMail, you use any CalDEV-enabled calendar app to manager your Exchange calendar, including Apple's iCal. From their site:
DavMail is a POP/IMAP/SMTP/Caldav/LDAP exchange gateway allowing users to use any mail/calendar client (e.g. Thunderbird with Lightning or Apple iCal) with an Exchange server, even from the internet or behind a firewall through Outlook Web Accessl.
So assuming your company has OWA setup, keep reading.
Running DavMail, you will be able to interface from your local machine to the remote Exchange server with full Calendar integration, full attendee completion and full free/busy support all via iCal and Mail.app. Let's get started.
NOTE Before We Begin…
At time of publication, DavMail is currently at stable version 3.6.3. A very recent bug fix allows DavMail to work with OWA login screens with some customizations (like we use at the University of Kansas) so I will go through how to build DavMail from source. I assume when 3.6.4 is available, this will not be necessary.
Step 0 - Build from source
Use Subversion to export the latest build from the DavMail repository:
svn export http://davmail.svn.sourceforge.net/svnroot/davmail/trunk davmail
Change into the new davmail directory and use Apache Ant, which comes standard in Snow Leopard, to build the installers:
cd davmail
ant
You will end up with binaries or installers for all supported operating systems, but we're only interested in DavMail.app for Mac. Let's copy it to our Applications directory then launch it.
cp -r dist/DavMail.app /Applications
open /Applications/DavMail.app
Step 1 - Setting up DavMail
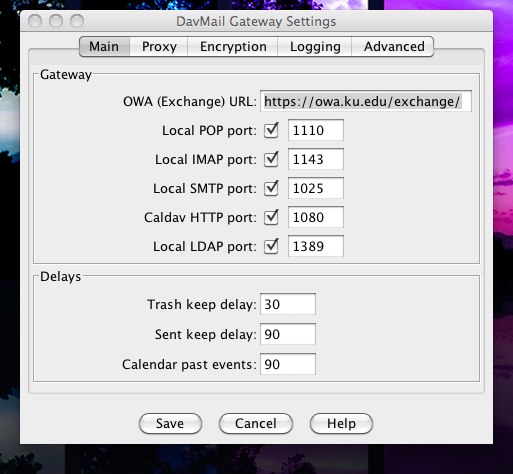
Open the Preferences menu from the DavMail application drop-down menu. This is where you enter your OWA URL and set the local ports the DavMail daemon will listen on.

The normal format of the OWA URL is https://exchangeServer/owa/ for Exchange 2007, or https://exchangeServer/exchange/ for older versions. Take note of the Caldev and LDAP ports, as we're going to use them to setup iCal. Obviously you want to use HTTPS here to encrypt communication between your machine and the OWA server.
Step 2 - Connect iCal to your Exchange Calendar
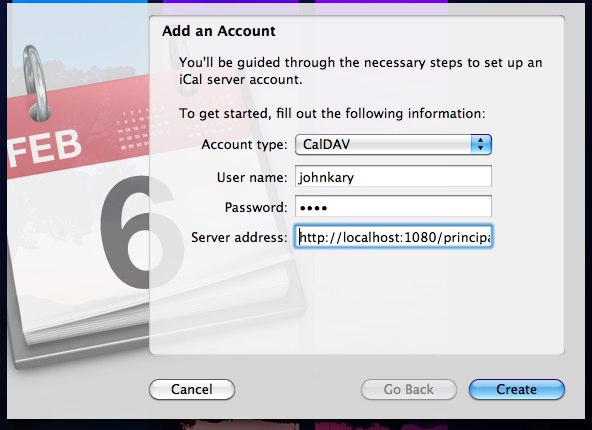
Launch iCal and open its Preferences window. Under the Accounts tab, click the + button to add a new calendar account.
Enter the following options:
Account type: CalDAV
User name: Your username WITHOUT the @domain.com
Password:Your password
Server address: http://localhost:1080/principals/users/username@domain.com
(where 1080 is your CalDAV port, and username@domain.com is your full username)
Click Create.

iCal will ask if you want to send your login credentials over an unsecured connection because we entered http://localhost… as our CalDEV server address instead of an HTTPS connection. But because we entered our OWA address as HTTPS, we are transmitting our credentials securely. For more info on security and DavMail, look under "Security" in the DavMail FAQ.
Step 3 - Setup attendee looking in LDAP
DavMail has pretty detailed instructions for doing this on its website, so rather than repeat them here, read the official documentation page for setting up attendee completion using LDAP.
Step 4 - And you're done!
You should now have a new Calendar in iCal and be able to create new calendar events and designate attendees right from iCal.
Step 5 - Bonus: Hide DavMail dock icon
You don't really need to interact with DavMail from the dock since it's more of an agent-application. We can hide the DavMail dock icon by editing the Info.plist and adding the LSUIElement key.
From Terminal, open DavMail.app's Info.plist using your favorite editor. In my case, I'll edit the text file using vi:
vi /Applications/DavMail.app/Contents/Info.plist
We now need to add the LSUIElement key and set it to true. Find the area of code around something like <CFBundleIconFile></key><string>tray.icns</string> and add this new key definition after it:
<key>LSUIElement</key>
<true\>
Save the Info.plist file and relaunch DavMail. The dock icon will be hidden but will still appear in the menu bar.